
Get a Call Back
The Practical Guide to Adding Custom Colour Swatches in Shopify
Feb 05, 2026
0 min read
1.7k views
In the fast-paced world of e-commerce, first impressions matter. Customers often decide whether to stay or leave within seconds of landing on your store. One of the most powerful tools for creating a professional and user-friendly shopping experience is custom color swatches.
Swatches allow customers to quickly preview different colors, patterns, or styles of a product — without opening each variant. When implemented correctly, they can increase conversions, reduce confusion, and make your store look polished and modern.
This guide will show you everything you need to know about creating custom color swatches in Shopify that work seamlessly on Collection pages and Product Detail Pages (PDPs), with smooth thumbnail updates and an intuitive user experience.
Why Custom Swatches Are Crucial for Your Shopify Store
Before we dive into implementation, let’s understand why swatches are so important:
- Enhances User Experience: Customers can quickly see all color options without navigating multiple pages.
- Professional Store Appearance: Swatches make your products look visually appealing and modern.
- Boosts Conversions: Easy visualization reduces buyer hesitation.
- Consistency Across Pages: Swatches work on Collection pages, PDPs, and quick view popups for a consistent experience.
In short: custom swatches = happy customers + more sales.
Step 1: Create Variant Metafields for Swatches
Swatches in Shopify rely on variant metafields to store a custom image for each variant.
How to Create Variant Metafields
- Go to Shopify Admin → Settings → Custom Data → Products → Variants
- Click Add definition:
- Name: Swatch Image
- Namespace & Key: custom.swatch_image
- Type: File (image)
- Description: "Image used as a swatch for variant color."
Save your metafield.
Pro Tip: Use small square images (50x50 or 80x80 px) to make your page load faster and keep swatches sharp.
Step 2: Assign Swatch Images to Variants
Once metafields are created:
- Go to Products → Select Product → Variants.
- Click on a variant.
- Scroll to Metafields → Swatch Image. Upload the image representing that variant’s color.
- Save your changes.
You can leave variants blank, in which case the system will use the variant’s featured image as a fallback.
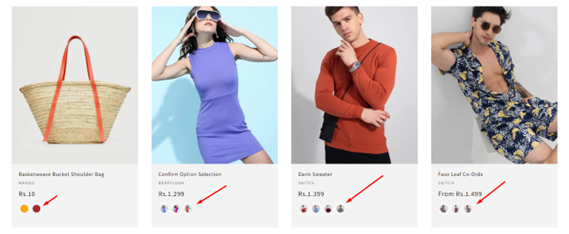
Step 3: Add Swatches to Collection Pages
Collection page swatches allow customers to preview variants without opening the product. Hovering over a swatch updates the thumbnail dynamically.
Liquid Code for Collection Page
{% for product in collection.products %}
<div class="product-card" data-product-id="{{ product.id }}">
<!-- Main Product Image -->
<img class="product-thumb" src="{{ product.featured_image | img_url: '300x300' }}" alt="{{ product.title }}">
<!-- Swatches -->
<div class="swatches">
{% assign seen = '' %}
{% for variant in product.variants %}
{% assign val = variant.options[0] %}
{% assign swatch_image = variant.metafields.custom.swatch_image %}
{% assign needle = '||' | append: val | append: '||' %}
{% unless seen contains needle %}
{% assign seen = seen | append: needle %}
<button
class="swatch-btn"
data-product-id="{{ product.id }}"
data-variant-id="{{ variant.id }}"
data-image="{{ swatch_image | default: variant.featured_media.preview_image | img_url: '300x300' }}"
style="background-image: url('{{ swatch_image | img_url: '80x80' }}');"
title="{{ val }}"
></button>
{% endunless %}
{% endfor %}
</div>
</div>
{% endfor %}
JavaScript for Smooth Thumbnail Update
document.querySelectorAll('.swatch-btn').forEach(btn => {
btn.addEventListener('mouseenter', () => { // Hover effect
const productCard = btn.closest('.product-card');
const thumb = productCard.querySelector('.product-thumb');
thumb.src = btn.dataset.image;
});
});
Customers hovering over a swatch instantly see the corresponding thumbnail, improving UX.
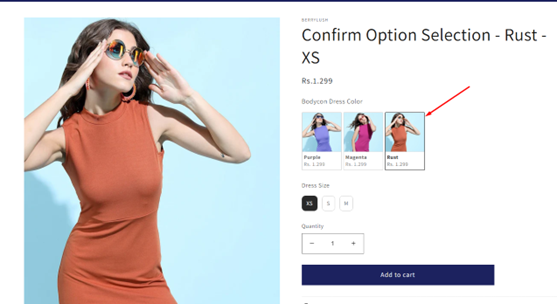
Step 4: Add Swatches to PDP (Product Detail Page)
Swatches on the PDP allow users to select variants and instantly update the main product image.
Liquid Code for PDP
<div class="product-main-image">
<img id="main-product-image" src="{{ product.featured_image | img_url: '800x' }}" alt="{{ product.title }}">
</div>
<div class="product-swatches">
{% assign seen = '' %}
{% for variant in product.variants %}
{% assign val = variant.options[0] %}
{% assign swatch_image = variant.metafields.custom.swatch_image %}
{% assign needle = '||' | append: val | append: '||' %}
{% unless seen contains needle %}
{% assign seen = seen | append: needle %}
<button
class="swatch-btn"
data-variant-id="{{ variant.id }}"
data-image="{{ swatch_image | default: variant.featured_media.preview_image | img_url: '800x' }}"
style="background-image: url('{{ swatch_image | img_url: '80x80' }}');"
title="{{ val }}"
></button>
{% endunless %}
{% endfor %}
</div>
JavaScript for PDP Swatch Click
document.querySelectorAll('.product-swatches .swatch-btn').forEach(btn => {
btn.addEventListener('click', () => {
const mainImage = document.getElementById('main-product-image');
mainImage.src = btn.dataset.image;
// Highlight active swatch
btn.closest('.product-swatches').querySelectorAll('.swatch-btn').forEach(b => b.classList.remove('is-active'));
btn.classList.add('is-active');
});
});
Step 5: Add Smooth Transitions & Styling
CSS for Swatches and Images
.product-thumb,
#main-product-image {
transition: all 0.3s ease-in-out;
}
.swatch-btn {
width: 40px;
height: 40px;
border-radius: 50%;
border: 1px solid #ccc;
margin-right: 5px;
cursor: pointer;
background-size: cover;
background-position: center;
}
.swatch-btn.is-active {
border: 2px solid #000;
}
Smooth transitions create a professional, modern effect when thumbnails or PDP images update.
Step 6: Best Practices
- Optimize Images: Small swatch images (50x50 or 80x80 px) for fast loading.
- Fallbacks: Always provide a fallback if a swatch image is missing (use variant image or background color).
- Active Highlight: Clearly show which swatch is selected.
- Consistent Design: Swatches on Collection and PDP pages should look and behave the same.
- Lazy Loading: If your store has many products, lazy load swatch images to improve page speed.
Step 7: Why This Works
- Customers instantly see variant options on collection pages.
- PDP pages update images smoothly when a swatch is clicked.
- Your store looks professional, modern, and interactive.
- Implementing swatches correctly can increase conversions and improve UX.
Conclusion
Custom color swatches are more than just a visual enhancement — they are a strategic tool for e-commerce success. By leveraging Shopify variant metafields, Liquid coding, and lightweight JavaScript, you can create a smooth, interactive experience for both collection pages and PDPs.
Remember: Happy customers = higher conversion. Swatches make it easy for customers to visualize your products, choose the right variant, and complete the purchase.
Implementing this end-to-end solution ensures your Shopify store not only looks professional but also drives results.
+
Companies Transformed
%
Client Satisfaction
/
Expert Support
Join the brands already working with Base2Brand
Continue Reading
No blogs found 🔍
Our Trusted Partners Collaborate Seamlessly To Drive Mutual Success


